I love Rube Goldberg machines. Love them. So when I wanted to add some physical IO to one, I figured it would be much more thematic and fun to connect my Pico-based Waveshare LCD + buttons to a Pi via serial, instead of simply using a Pi hat directly.

I found a few guides around for getting the serial communication going, but none were exactly in the form I needed. I ended up breaking them down and combining them to create a simpler foundation for my own use. Hopefully this helps you if you’re looking to do the same or to understand the general concepts and build your own.
Pico Micropython serial key concepts
stdin.read()reads input from USB serial,print()writes to it. It’s almost as simple as that.stdin.read()is a blocking call so we useselectorpollto only call it when there’s data there. Otherwise the loop will hang there.- there’s no easy micropython way to get all the bytes available from
stdin.read(). Instead we get the minimum there could be (1) and loop until our polling returns false. - All micropython pico interaction from Thonny, pico-go etc happens via control characters sent via serial. It’s serial all the way down!
- I use the
ampyCLI tool (pip install adafruit-ampy) to control it instead because that releases control of the serial port when it’s done. Otherwise I’d have to close VSCode every time I wanted to run the serial program on the PC side.
References
- https://forums.raspberrypi.com/viewtopic.php?t=302889
- https://forum.micropython.org/viewtopic.php?t=7325
- https://medium.com/geekculture/serial-connection-between-raspberry-pi-and-raspberry-pico-d6c0ba97c7dc
- https://blog.rareschool.com/2021/01/controlling-raspberry-pi-pico-using.html
- https://stackoverflow.com/a/66037406
Background thread
One of the links above runs the serial buffer on the second processor. After trying to work with this for a while, it turns out that Micropython doesn’t play well with the second processor on the Pico yet. Even with gc.collect() and clean exits everywhere it will hang and cook the USB-to-serial interaction until a hard reboot.
Avoid using the second processor on the Pico in micropython for now.
Quickstart
The code is in https://github.com/GSGBen/pico-serial. If you have the same Waveshare LCD and a Windows PC you can get an example going quickly:
- Connect your Pico to a PC via USB
- Upload
main.pyandwaveshare_lcd.pyto your pico and restart it, leaving it connected to the PC - Update the serial port settings in
serial_test.py, start it on your PC and leave it running - Start some compatible media playing, like playing a youtube video in Chrome (anything that populates that Windows 10 media overlay)
- Stop
serial_test.py, open up a terminal to the Pico serial connection and press theabutton on the LCD board
serial_test.py on the PC should start sending the title of the currently playing media over serial, and also printing it. The loop on the Pico in main.py should read it and display it on the LCD. When you press the a button your terminal session should print an extra line (but serial_test.py could be modified to do this instead).
Code explanation / details
Here’s the guts of it.
Setup
Set up our variables to store the data we receive. Until we get a full line (\n) we’ll keep appending data to buffered_input. When we have a full line we’ll move it to input_line_this_tick. It’ll only stay there for one tick (loop) so that the PC can send the same input again and it will be treated as new input.
__init__(self):
    ...
    self.buffered_input = []
    self.input_line_this_tick = ""
    ...
Read function
stdin.read() is blocking which means we’ll hang until there’s input. Instead use select to only read if there’s anything available.
Note that select is deprecated. Replace with Poll to follow best practises.
def read_serial_input(self):
    select_result = uselect.select([stdin], [], [], 0)
    while select_result[0]:
There’s no easy micropython way to say “read all the bytes available”. instead, get the minimum there could be (one) and keep checking with select again and a while loop.
        input_character = stdin.read(1)
        self.buffered_input.append(input_character)
        select_result = uselect.select([stdin], [], [], 0)
Look for \n in the input to determine when a line is submitted. If it has, make it available to other code via input_line_this_tick and remove it from the buffer. If there’s remaining data after it, leave that part. This should remove just the earliest line and allow multiple lines buffered in some ticks to work. However if there are multiple lines every tick, the buffer will continue to grow indefinitely and the pico will run out of memory.
If we don’t have a full line this tick, clear the variable where we store them so code can infer that if the same input is present there in multiple ticks it’s new input, and can retrigger. This also allows simple if self.input_line_this_tick: checking.
    if TERMINATOR in self.buffered_input:
        line_ending_index = self.buffered_input.index(TERMINATOR)
        self.input_line_this_tick = "".join(self.buffered_input[:line_ending_index])
        if line_ending_index < len(self.buffered_input):
            self.buffered_input = self.buffered_input[line_ending_index + 1 :]
        else:
            self.buffered_input = []
    else:
        self.input_line_this_tick = ""
Main loop
It all comes together in the main infinite loop. We track a copy of the serial input that only gets updated when there’s input, so we can draw the text every tick. We need to draw it every tick because I’m using my standard Pico scaffolding that redraws the screen every tick.
def main(self):
    ...
    latest_input_line = ""
    ...
    while self.run_loop:
Buffer the serial input and potentially give us a full line using the function we looked at before.
self.read_serial_input()
If we received a non-empty string this tick start displaying that. Always redraw either that or the existing text for this tick’s draw call.
        if self.input_line_this_tick:
            latest_input_line = self.input_line_this_tick
        self.lcd.text(latest_input_line, 5, 14, 0xFFFF)
Draw to the screen.
self.lcd.show()
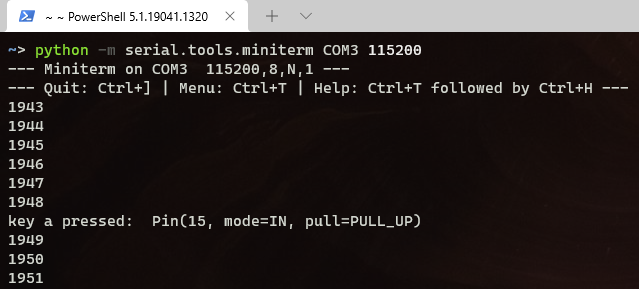
Output
The output is simpler. print() outputs an incrementing count in the main loop, and an interrupt is set up to get the a key to trigger another function that prints the pin details.
def main(self):
    ...
    counter = 0
    ...
    while self.run_loop:
        ...
        print(counter)
        counter += 1
def __init__(self):
    ...
    self.key_a.irq(trigger=Pin.IRQ_FALLING, handler=self.on_key_a_pressed)
    ...

def on_key_a_pressed(self, p):
    print("key a pressed: ", p)
Result
Other code
There’s other quality-of-life code in the example files that I’ve found useful when developing on the Pico. I’ll cover those in another post.
Videogames
Hey, do you like videogames? If so, please check out my game Inventor Simulator on Steam, and consider adding it to your wishlist. Craft inventions and sell them to customers, then automate your workbench, workshop and store! Research new inventions or create your own from scratch. Set prices based on an economic model, unlock and craft upgrades, and vertically integrate your supply chain. Become the world's greatest inventor!See full gameplay on Steam!